So below is the unedited and the final edited version of my animation for the After Effects project. :} Involved rig removal, green-screen, changing the brightness on every other frame, a few meltdowns, and the sparkles!
Oh, and since I seem to be dreadful at keeping my blog up to date, here's a link to my instagram below. Full of doodles, animation, gigs and my cat. :}
My new armature looking all fancy. Extra joint in the spine. oooo
During this part of the project I was crazy ill, so taking photos of the making process wasn't really a priority at the time. Here's a little doodle of how I made the broom. :}
1. Twisted wire to the size I wanted the broom.
2. Glued a bit of K&S to the side to create a rigging point.
3. Sewed brown felt around the wire. The K&S gave the broom a cool ridged look. :)
4. Sewed copper wire to the end of the broom to make it animate-able. (Is that a word?)
5. Then stitched the wool over the top!
Broom & rig. aw
Spot the rigging point.
First test of animating the broom on my bedroom floor. ^_^
Now onto the hat!
1. Measured the size of the armature head and then cut the bottom part of the hat out of black felt.
2. Ugh Maths. Literally the first time I've needed to know about circumference and all that nonsense since GCSEs. But yeah, Maths happened to find out the cone measurements.
3. Stitched the cone up.
4. Sewed the cone and the bottom together. TaDa!
I made four different kinds of wands, it's nice to have a choice. ^_^ Glued teeny magnets onto the bottom so it would be easier for the armature to keep hold.
Wooah last post was in July? Oops.
Ooookay, so I'm currently in the middle of pre-production on my final project in uni, scary stuff! But I'll save all that for another post, which will probably be posted a trillion years after the deadline.
The latest project was to animate and then use After Effects to make it all snazzy/get our heads around using the programme. I wanted to use an effect that you'd also have to use in live action so magic was the first thing to come to my mind. Magic = Fun. If there's a TV Show with a witch, there's no doubt that, that character will be my favourite, so it was decided! My armature was going to be a witch!
I already had the idea to animate the character casting a spell, I just needed to decided what kind of spell. My alternative option was to animate a witch on a broom, so I combined both ideas and came up with a sort of Fantasia themed animation, where a broom comes to life.
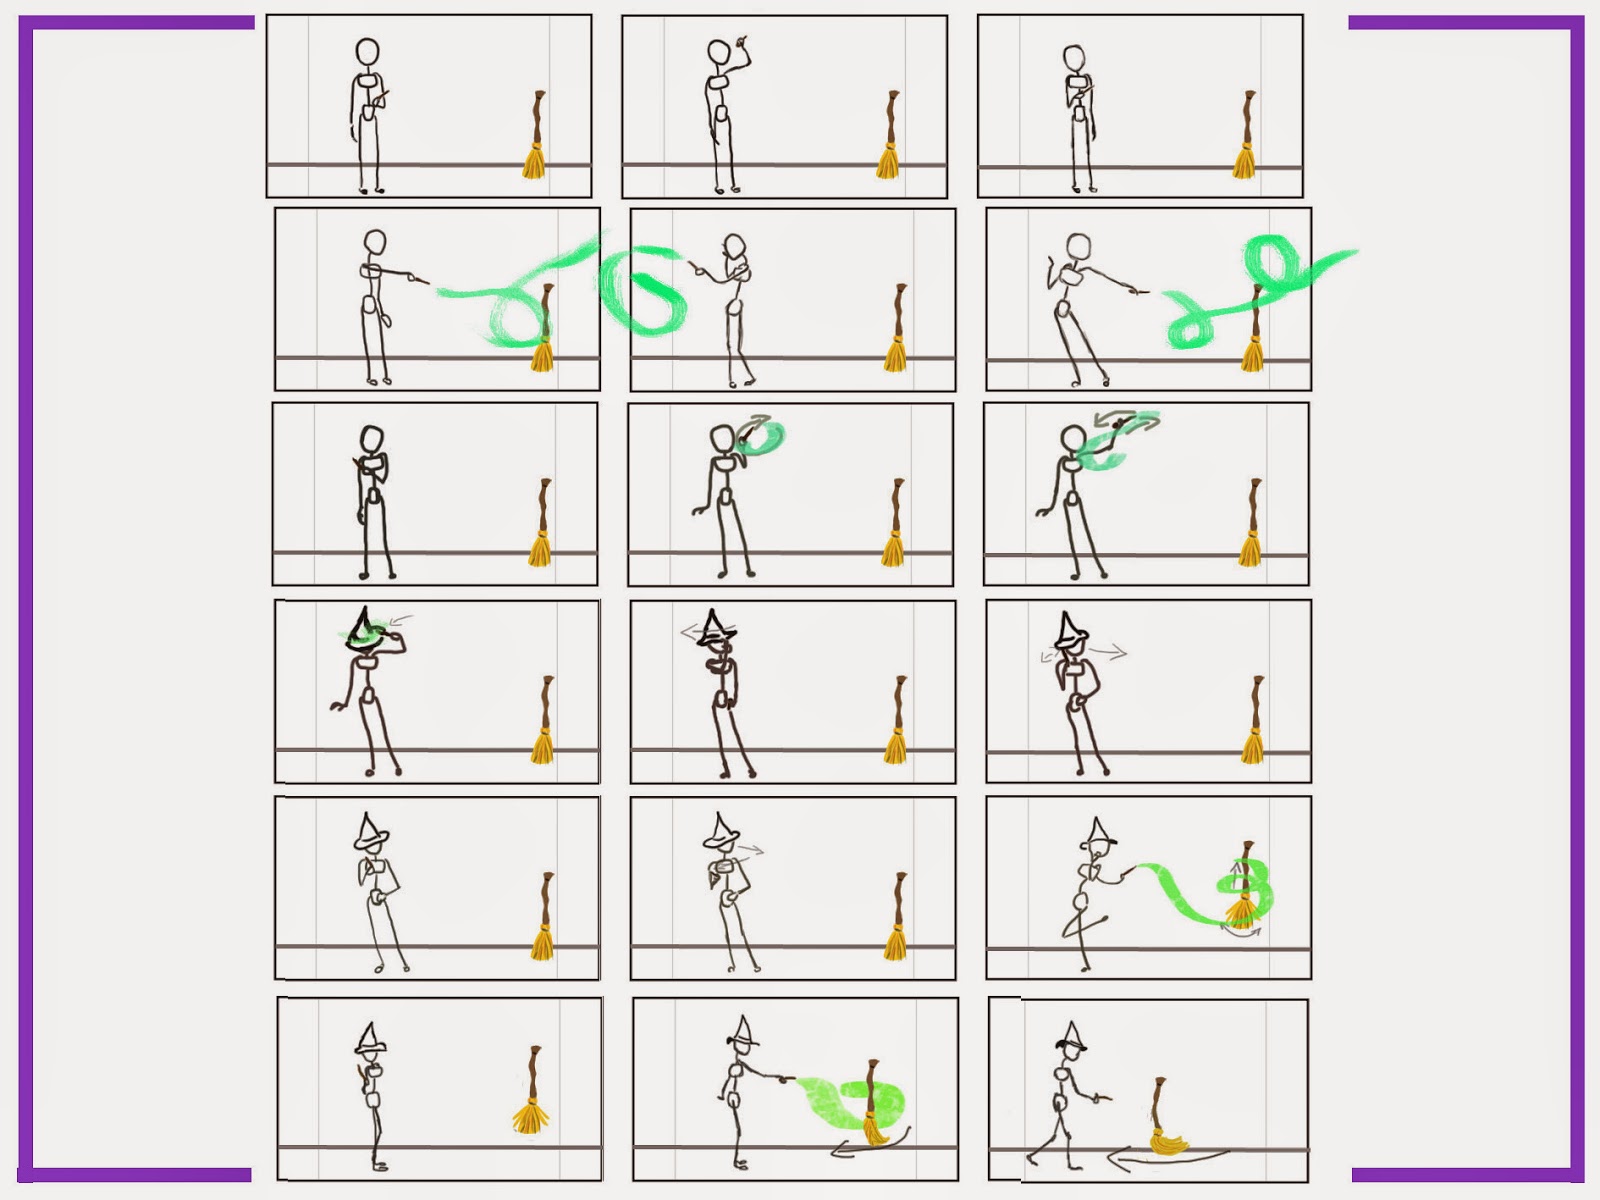
Below are some quick thumbnails of ideas and key poses. ^_^
(Thumbnails/plan)
Keeping in mind I hadn't the foggiest idea how to use After Effects, I had to decide what effects I was going to use. Which was kinda stressful considering I unsuccessfully tried to create fire while listening to a tutorial by what sounded like a 8 year old boy.
But I got there in the end! Take that 8 year old boy! I can also make fire! IT'S CUBES! It's just blurred cubes!
I wanted some sort of effect to come out of the wand to show the direction of the spell. In the end my aim was for that 90s sparkle effect, like in Sabrina the Teenage Witch/Buffy.
Below is my first test of the sparkles. Colour change and everything!
I really wish I had more time to spend on collaboration. It was lovely being able to just animate what someone else has made!
But I'm confused with what I'm allowed to put on here because of the Glammies and whatnot so I'll save that for another post.
Anyway! The final performance! This is where I had to animate a character interaction, with a chosen dialogue, so I went for the lift scene in (500) Days of Summer.
(Blogging makes me sleepy, so sorry if none of this makes any sense!)
I have such a love/hate relationship with making the characters, so I'm surprised making two of them in such a short period of time didn't give me a breakdown.
So here are the two basic armatures I made!
I sewed foam around the arms as I was sick of epoxy glue.
I'm kinda really pleased with how the hand turned out!
Photo above is how I made the made, I basically just put the wire around the nails then twisted the ends together. This way the hands were all roughly the same size! Also less chance of the fingers snapping!
I stuck bits of foam for the palm, and stuck a magnet on top of that so the characters could pick up vinyl's.
This is how they turned out! I sewed skin coloured felt around the wire with invisible thread.
(The bottom right one is my favourite. Who needs latex?)
Then onto the clothes! Luckily their legs are always hidden by the table so there was no need to make trousers! Wooo time saving! To make the clothes I did the whole masking tape over cling film technique and then used the patterns from that to create the clothes!
To make this a lot easier, I named the male character Herby and the female Willow.
Here's the progress of Herby's face being made! I suck at making faces, they always end up looking the same, but practice makes perfect! I then started to give him hair, at first he looked a bit like Ringo.
(Check out his ears. Aren't they adorable?!)
Now on to Willow! (Hint in the background why that name popped into my head.) Because I was scared that the hair was going to be too heavy I placed wire in the head to give the hair some support. I had way too much fun with the hair! I used three different colours, green, blue and dark blue.
Fun fact: I made the hair on May 4th. Perfect day to make Princess Leia inspired hair!
For Herby's mouths I just used the ones I bought off animation tool kit a while ago, and added two.
For Willow I used my mouth as reference, hence the clown lips...
Their feet were made out of k&s and washers just so I could hold them in place with magnets.
Annnnd here they are in their little music store! Saeed made the table and the boxes full of vinyl's for my set. He even made teeny little Vinyl covers with The Smiths on! Amazing ^_^ (Here's Saeed's blog. :} http://saeedslittleworkspace.blogspot.co.uk/ )
I really want to re-animate this one. I only had two days left to animate 20 seconds, so any mistakes I made had to stay! If anything it's an achievement that I managed to get it done in two days! So here it is!
Oh and if these video things aren't working, here's a link.
As I wanted to animate a rabbit hopping, I needed to make a rabbit armature! Which could've been made a billion times better, but oh well, like I've said before, I'm improving... ^_^ I'm also just realising I really haven't taken many photos of the whole 'making process' but my hands were covered in epoxy glue for a good few weeks so I didn't want to ruin my camera!
So below is a photo of the soon to be rabbit legs, and shoulder and hip joints, with k&s glued in place.
Cheeky close up.
below photo of all the k&s glued in place! just needed to sort the feet out, attach the legs and give the rabbit a head!
I wanted to give the rabbit bigger feet so i carved a gap out of the balsa wood for the k&s to fit. I then sanded them down to make them rounder/more paw like.
To make the rabbit head I just glued three pieces of balsa wood together then sanded it down until it kinda looked like a rabbit head. I then made two holes for the ears to be glued in place.
Ears are honestly the best things to animate. So fun, and they're so cute! To make them animate-able (is that even a word?) I made them out of wire, then twisted the ends so I could slot them into the holes in the head. Then to make them all snazzy I sewed some fabric around them to hide the wire.
I painted the wooden parts of the rabbit grey, and put grey milliput over the joints to keep them sturdy. ^_^
Then taaadaaaa! Finished. (okay, the photo isn't the finished thing, just picture the head and feet painted grey.)